Saturday, August 25, 2012

Is summer really creeping to an end? ALREADY??

Boy, once again, summer has flown by WAY faster than I wanted it to! And...for those of us here in Minnesota, it is State Fair time. What does that mean, well, for me it means a great day out with my hubby - but it also means a whole lot of food temptations that I will most definitely pay for if I'm not careful! I love fair time and used to love trying all the new and most outrageous foods they came up with each year, sadly I've had to change my favorite fair past-time to people watching as I can't eat most of the "new" and "crazy" new foods they have figured out how to put on a stick here in MN...

I was thrilled to learn a couple weeks ago that on the list of the 40 new foods at the fair, that there were a number of Gluten Free options joining the ranks. What I was even more excited about was when I got there today and not only tasted the yummy goodness (risotto poppers and chocolate cupcake) at French Meadow Bakery, but also how many people were ordering the gluten free goodness. I hope that means that next year will have EVEN MORE!! Thank you Minnesota State Fair for thinking of those of us with gluten intolerances and allergies!! WE APPRECIATE IT!!

Risotto Poppers @ French Meadow Bakery at the MN State Fair - they were yummy!!

Thursday, August 2, 2012

Kale Chips

A few months back, my younger brother (who claims I'm the one who eats weird stuff) asked me if I've ever tried Kale Chips. I was quick to say that I hadn't, the thought hadn't even crossed my mind. I had never tried kale, let alone bought it and cooked it! He told me that he had tried kale chips he bought from the store and really thought that the homemade ones were much better. I cataloged it to the back of my mind and figured that some day, when I was feeling particularly adventurous, I would think about buying some kale and trying kale chips.


Well, I guess that day has come. I was at the farmers market this past weekend with my husband and two nieces - urging them to find a food they'd never tried before. My husband picked out thai green eggplant and I decided to go for the kale - needless to say, the neices didn't find anything new that they were brave enough to pick out :) I was sure to ask the lady at the stand how long the kale usually keeps for, as I figured I likely wouldn't get to it for at least a couple days. She assured me that in the bottom drawer of the fridge it could last 7 - 10 days.

Well, a few days later, here I am, yup, just made some kale chips this evening. Really, they're quite simple to make. Gather your cleaned kale, some olive oil, salt and pepper. You can also use other seasonings such as red pepper flakes, garlic powder, onion powder, oregano, vinegar, or tabasco sauce, the options are endless.

I started out with my clean and dried kale

Since I had never tried kale before, I of course, had to try a couple bites of it raw. I learned a long time ago, that you can never fully appreciate a vegetable unless you've tried at least a bite of it raw - that's when you get the true, full flavor of the vegetable.

I gathered my simple ingredients along with

I used parchment paper on a cookie sheet, but the recipe I used said to use aluminum foil on a cookie sheet. I don't know if that made a difference in timing or not.

I used my new mistor to lightly coat the kale with Extra Virgin Olive Oil and then cracked some salt and pepper over the raw kale before putting it in the oven
(this picture actually shows some basil garlic seasoning on one and garlic parmeasan on the other)

Bake the kale in a 350* oven for 10 - 20 minutes. I guess the timing depends on what kind of kale you use and how wet it is when put in the oven. You only want to bake it until it starts to turn brown (my first couple batches were way over done and you can tell in the flavor - it almost tastes burnt).

Now that your kale chips are done - if you didn't tear the kale into small bite size pieces, you can do that now, or just leave them big and take a big bit and ENJOY!!


Kale Chips
- One bunch of Kale
- 1-2 Tbsp EVOO (Extra Virgin Olive Oil)
- 1-2 tsp salt
- Other seasonings (listed above) to taste

Instructions:
- Preheat your oven to 350 degrees.
- Take your washed and patted dry kale and place it on a parchment paper covered cookie sheet. Spray/mist with olive oil and salt and season to taste.
- Bake for 10 - 20 minutes, checking at least every 10 minutes to avoid over cooking.
- When the kale chips begin to brown on the edges, remove from the oven. You can enjoy the fresh from the oven (be careful - they will be a bit hot). After they cool they can be stored in an air tight container in the refrigerator.

Kale is rich in vitamin A and K!


Tuesday, July 31, 2012

Gluten Free Food of the...Week? Maybe Month!

Well, I've been absolutely awful at keeping up with this blog, and I apologize about that...summer just seems to get busier and busier every year (and we don't even have kids yet!)!! So, one of my favorite camping treats this summer is chocolate chip cookie s'mores. Instead of graham crackers and hershey's bars, I've started using Pamela's Chunky Chocolate Chip Cookies - and they're delicious! Unfortunately, I've been out camping, and around a fire each time I've used these fabulous cookies to make my new GF version of s'mores, so I don't have a picture of them for you, but I do have a picture of the cookie packaging so you can find them at your local grocery store - and if they don't carry them, I would recommend asking them to get them (they're the best "boxed" gf chocolate chip cookies I've tried so far)!

Mind you, I don't get anything for suggesting these foods you all of you, I am just trying to share with you the brands that I've found to be the best GF version of the "original"! Try them and Enjoy! you won't be disappointed!

Tuesday, July 3, 2012

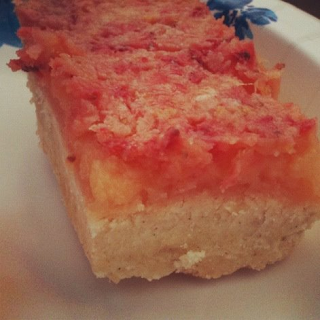
Gluten Free Strawberry Lemonade Bars

We're heading out tomorrow to a 4th of July celebration and there seem to be so many yummy desserts, but, none of them are gluten free and since my nephew who is also gluten free (to ease symptoms of autism) will be there too, I decided to pull out the shortbread cookie mix that's been sitting in the cubboard and make some bars. But, not just any bars, I've been craving lemon bars so I found a fantastic sounding recipe and decided to attempt making it Gluten Free! So here goes...


I've been craving lemon bars for the past few weeks, but have kept myself from making them because I didn't want the whole pan sitting at home staring at me shouting "EAT ME! EAT ME!" So, I waited patiently until I had a gathering to go to where I would need to bring something to share...and that gathering has finally come - I can't wait to try them!!

 I gathered my ingredients, and got ready to start baking!

I started off with the fruit - I needed a couple teaspoons of lemon zest, so I got started...

Next, I juiced 1 cup of fresh lemon juice (6 lemons), I did include some of the pulp for added flavor!

Next comes the strawberries, the recipe I found calls for 1/2 cup pureed strawberries, since I'm not real good at follow recipes to a T, I used about 3/4 - 1 cup of pureed strawberries.

My fresh lemon juice, lemon zest and pureed strawberries :)

And now to get going on the crust!

 
I followed the directions on the packaging and started out by beating the butter, then adding the egg yolk and water.

 
The packaging says to slowly add in the mix, so I started out slow...

And kept going until it was all mixed in and looked crumbly like the package said it would (I love it when things go like the packaging says it should)!

 
I've had bad experiences in the past with gluten free mixes sticking to the pan (or paper liners) so, I wanted to be sure it wasn't going to come out messy at the gathering tomorrow, so I prepared my pan with some vegetable shortening. The mix went in easy, I pressed it down into the pan until it was in an even layer. NOW, it needs to go into the oven for a little baking time before we add the strawberry lemon mixture.

Mix together the lemon juice, lemon zest, pureed strawberries, sugar and eggs and beat until smooth.

...then add the all purpose gluten free flour mixture, baking powder and salt.

Yum! Looks ready to add to the crust...is it ready yet!?

It is! And as with so many other gluten free things (find that you have to toast GF bread much longer for it to "look" toasted than "normal" bread), it doesn't look much different when when I put it in the oven! But, the house is smelling wonderful, so I know it was baking in there :)

Pour the strawberry lemon mixture over the crust and put it in the oven to bake...

YUMMY!! So close to being ready to eat...let it cool now before sprinkling with powdered sugar.

NOW, ENJOY!!


Gluten Free Strawberry Lemonade Bars

Shortbread Crust
1 whole package Bob's Red Mill Gluten Free Shortbread Cookie Mix
1 1/2 sticks of butter (I use "I Can't Believe It's Not Butter")
1 large egg yolk
2 Tbsp water

Strawberry Lemonade Topping
1 cup fresh lemon juice
2-3 tsp lemon zest
3/4 cup fresh pureed strawberries (about 1 cup whole)
1 1/4 cups sugar
4 large eggs
1/4 cup gluten free all purpose flour mix (see below)**
1/2 teaspoon baking powder
1/4 teaspoon salt

powdered sugar for dusting

Directions
1. Preheat oven to 350 degree oven and grease 9 x 13 in. pan with vegetable shortening (to prevent sticking).

2. Prepare Shortbread Crust according to package. Pour mixture into prepared pan and press into an even layer. Bake for 17 minutes until the edges are set.

3. Filling: Combine lemon juice, lemon zest, strawberry puree, sugar and eggs and beat until smooth. Add in flour, baking powder and salt and mix until well combined.

4. Pour filling over hot crust. Bake for 25 - 30 minutes until the filling is set.

5. Cool completely before dusting with powerdered sugar - then ENJOY! Keep refridgerated.


**Gluten Free All Purpose Flour Mixture
1/2 cup Rice Flour
1/4 cup Corn Starch
1/4 cup Tapioca Flour 

Food of the Week

A couple months ago I happened to find a LARGE variety of Gluten Free Bob's Red Mill flours and mixes, so, I picked up some pizza crust mix, cornbread mix and shortbread cookie mix. Since I haven't ever really been a huge fan of plain shortbread cookies, and I've been craving lemon bars, I searched out a recipe and found a fantastic Strawberry Lemon bar recipe that uses a shortbread cookie crust on the bottom. So, I'm sharing this wonderful mix with all of you (I'll be posting the outcome of the Strawberry Lemon bars soon)!


I've been so impressed lately at the quality of the gluten free products available now. It was only a couple short years ago that I decided to go gluten free after reading on some FB group posts that it helped some people with their symptoms. At that time there were only people here and there that had taken the plunge to manage their Fibro symptoms, but today, there are a lot of group conversations as well as blogs and articles that discuss how effective it can be for some people. It's not known why exactly gluten affects the symptoms of Fibro, much like they don't know what causes the the symptoms to begin with, BUT, what we do know is that for some reason it helps. And really, if something so simple and natural helps, I don't need an explaination of why it helps. I just need to remain committed and LIVE my life!

Wednesday, June 27, 2012

Food of the Week

I seem to have been absent for at least a week...apparently I was just so busy, or my fibro fog was thicker than I thought...that what I thought was only a couple days turned into two weeks! Sorry about that folks!! Anyways, since I seem to have completely skipped a week, I'll start this week with a new Food of the Week. One of my favorite baking mixes...Betty Crocker GF Yellow Cake Mix.


I have found that I am able to create GF versions of so many tasty desserts with this one box of yellow cake mix. I should probably note that I am not much of a baker (mostly because I don't want all those sweets around the house or I'll eat them all!!), but when I do decide to do some baking - usually for holidays and such - I turn to the wonderful GF Betty Crocker mixes. I have made (successfully may I add), layered carrot cake and sugar cookies with this mix and it's just wonderful. I've been wanting to make a bunch of other things, but just haven't had the right event to bring them to. Hopefully the summer (and all the get togethers that come with it) allow for some baking to try out more of the delicious recipes on the Betty Crocker website (and no, I'm not a promoter of Betty Crocker - only of ways to enjoy GF versions of my favorite goodies)!!

Make sure you check out some of the awesome recipes on Betty's website - please share with me successes you've had with her yellow cake mix or any of the others!!

http://www.bettycrocker.com/recipes/health-and-diet/gluten-free


Monday, June 18, 2012

Chicken BLT Salad -- YUMMY!!

With the temperature hoovering around 90 and the dew point around 60 here in the Twin Cities today, I decided it was just too warm to even go stand over the grill to cook something for dinner. So, I stopped by the grocery store on my way home from work and picked up the ingredients for my Chicken BLT salad that my husband absolutely loves!

I came up with this combination a couple weeks ago after craving a BLT but trying to keep with my low carb (refined and sugars) diet. So, I figured out a way to put it in a bowl without the bread, but with all the delicious flavors!

Mmmmm...such a yummy twist on the BLT comfort food - great for a hot summer day!

The basic ingredients - torn/chopped rotisserie chicken with the classic bacon, lettuce, tomato - and you can't have a salad without some cheese and dressing!!

I start by chopping up three ripe roma tomatoes and adding them to a large mixing bowl

Next comes the fresh lettuce...yup, clean and chop up a whole head!

Throw the lettuce in the bowl with the tomatoes...already starting to make my mouth water!!

Next, dump in the bacon pieces (pre-cooked or fresh and crumbled at home)
...everything's better with bacon!!

Make the dressing with a couple tablespoons of mayo, a teaspoon or so of fat free half & half and a couple packets of splenda with fiber

Add your dressing and toss until the lettuce, tomatoes and bacon are evenly coated.

It'll look something like this. If you want, you can stop here and enjoy, or continue on to the cheese and chicken for a bit more flavor!!

Add in about a cup of shredded cheese and about a cup and a half of shredded chicken and toss until evenly coated/mixed...

AND...NOW...IT'S...TIME...TO...ENJOY!!!


Chicken BLT Salad

Salad:
1 head iceberg lettuce
3 roma tomatoes
1 package oscar mayer bacon pieces
1 cup shredded cheese (whichever you prefer - I used marble jack)
1 1/2 cups shredded rotisserie chicken (chilled)

Chop up the tomatoes and roma tomatoes, add the bacon pieces and toss with the dressing (see below). Add shredded cheese and shredded chicken and toss until well coated - ENJOY!!

Dressing:
3/4 cup mayo
3 packets splenda with fiber
1-2 teaspoons fat free half & half (adjust for consistency preferred)

Mix mayo, spenda and half & half together until smooth - you may choose to add a bit more or less half & half depending on your preferred consistency for the dressing.


Thursday, June 14, 2012

Food of the Week

The biggest change I've made in my life to help me to LIVE with my fibro symptoms has been to cut out gluten containing foods. I first decided to go gluten free back during the summer of 2010 - at that time there were only a handful of items out there and companies making good tasting gluten free alternatives. Over the past couple years, the gluten-free options available in the grocery store have EXPLODED!! This is a good thing for those with the allergy (celiac) or those like me who have a sensitivity to it. I've had the blood tests (which were included with the numerous others taken to get to my fibro diagnosis) that indicated I don't have celiac, but my doc said that if it helps, go for it! So I took the plunge and haven't regretted a single minute of it!

So, I'm going to try to highlight one gluten free product, brand or food item that I've found and love. Since we all have different tastes, something I think is good may not be what you decide tastes the best, SO, I'm asking for input from each of you for food items you may have found (that might not be available in the stores here in Minnesota) so they can be shared with everyone else.

To start off the "food of the week," I am focusing in on Udi's Gluten Free Bread. I was introduced to this brand by my nephew (he happens to be autistic and has found relief by going gluten free also) a few months back and have decided that I completely agree with him that it tastes about as close to "normal" bread as I think store bought gluten free bread can get.


Generally Udi's bread is found in the freezer section of most grocery stores (at least here in Minnesota); however more stores are beginning to shelve it in the bakery section - I was able to find some very good information regarding the shelf life of Udi's bread depending on where you store it from A Spoon Full of Wellness' blog. Here's what she says:

Here is the recommended shelf life for Udi products:
*       At room temperature: 5-7 days
*       In refrigerator: 21 days (the refrigerator will only prolong the life of the bread but since it's bread, it may dry out)
*       In freezer: 6 months
Please note their breads do not spoil, as with any other bread products, it will mold.  So as long as it's not moldy, you can refreeze or refrigerate the product.

There are a number of other Udi products, but I'll cover those in the future - but definitely do try yourself some Udi's products, they just might suprise you (and make you almost think you're eating "normal" food)!!

Wednesday, June 13, 2012

Quinoa Caprese Salad


One of our (my husband and I) favorite summertime salads is Caprese salad. I have made just about all of the variations of the tomato, fresh mozarella and fresh basil salad I had seen and could come up with...then I saw a picture of it with Quinoa in it. I have only recently begun experimenting with this wonderful (and completely gluten free) grain. I found my Quinoa at Trader Joe's, but have seen different brands in almost every grocery store I've been in.

I think I saw the recipe when going through Pinterest, but apparently didn't pin it, nor was I able to find it again, so, I'm not sure if mine is the same as the recipe I saw (I had to try to recall the recipe from seeing it for only moments a day or two ago). So, here goes...

I got a bit of a jump on the salad before I remembered to slow down and take some pictures! I used a container of cherry tomatoes and cut them in half...then sliced up a handful of basil

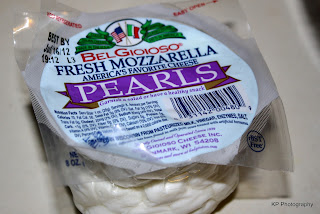
To make things easier on myself (okay, just to cut out a step) I bought the fresh mozzarella pearls - so it was easy peasy to just open the package an separate the pearls while adding them into the bowl

Yum, looks good already!!


Once the mozzarella is mixed in I add my EVOO and Balsamic Vinigar to the mix...


And now comes the newest addition to my Caprese salad - Quinoa


Add the quinoa to the tomato, mozzarella and mix in.

Mmmm...looks good!! I did have to add a bit more EVOO and Balsamic Vinigar as well as a bit of salt and pepper to taste.

And waalaa...a perfect side to some grilled chicken legs for dinner!

Quinoa Caprese Salad

1 package cherry tomatoes (halved)
1/4 c. fresh chopped basil
1 package fresh mozzarella pearls
1 c. uncooked quinoa (will be a couple cups when done cooking)
1/4 c. extra virgin olive oil
1/4 c. balsamic vinigar
Salt & Pepper to taste

Cook the quinoa according to directions on package (mine was 1 c. quinoa to 2 c. water and simmer until all water is absorbed - approxl 10-15 min). Cool to at least room temperature before adding to the salad.

Mix together the tomatoes, basil and mozzarella and add the olive oil and balsamic vinigar. Mix in cooked and cooled quinoa. Add additional vinigar as well as salt and pepper to taste (if necessary).

Enjoy as a heartier version of everyone's favorite caprese salad!